


This guide should help you understand and start using the new AI Video features in our software. Enjoy creating your videos!
If you haven’t used AI in our program before, please check out our AI guide: Open Manual
Working with AI Video
Working with AI Video is very similar to working with AI Photo. Note that you can choose only one AI Video template per project.
If you haven’t used AI in our program before, please check out our AI guide: Open Manual
Working with AI Video
Working with AI Video is very similar to working with AI Photo. Note that you can choose only one AI Video template per project.
How AI Video Processing Works:
- Photo Capture: You take photos (optional: these photos can also be processed by AI).
- Video Generation: The photo is used to generate an AI video.
- Final Processing: The generated video is then sent for final processing.

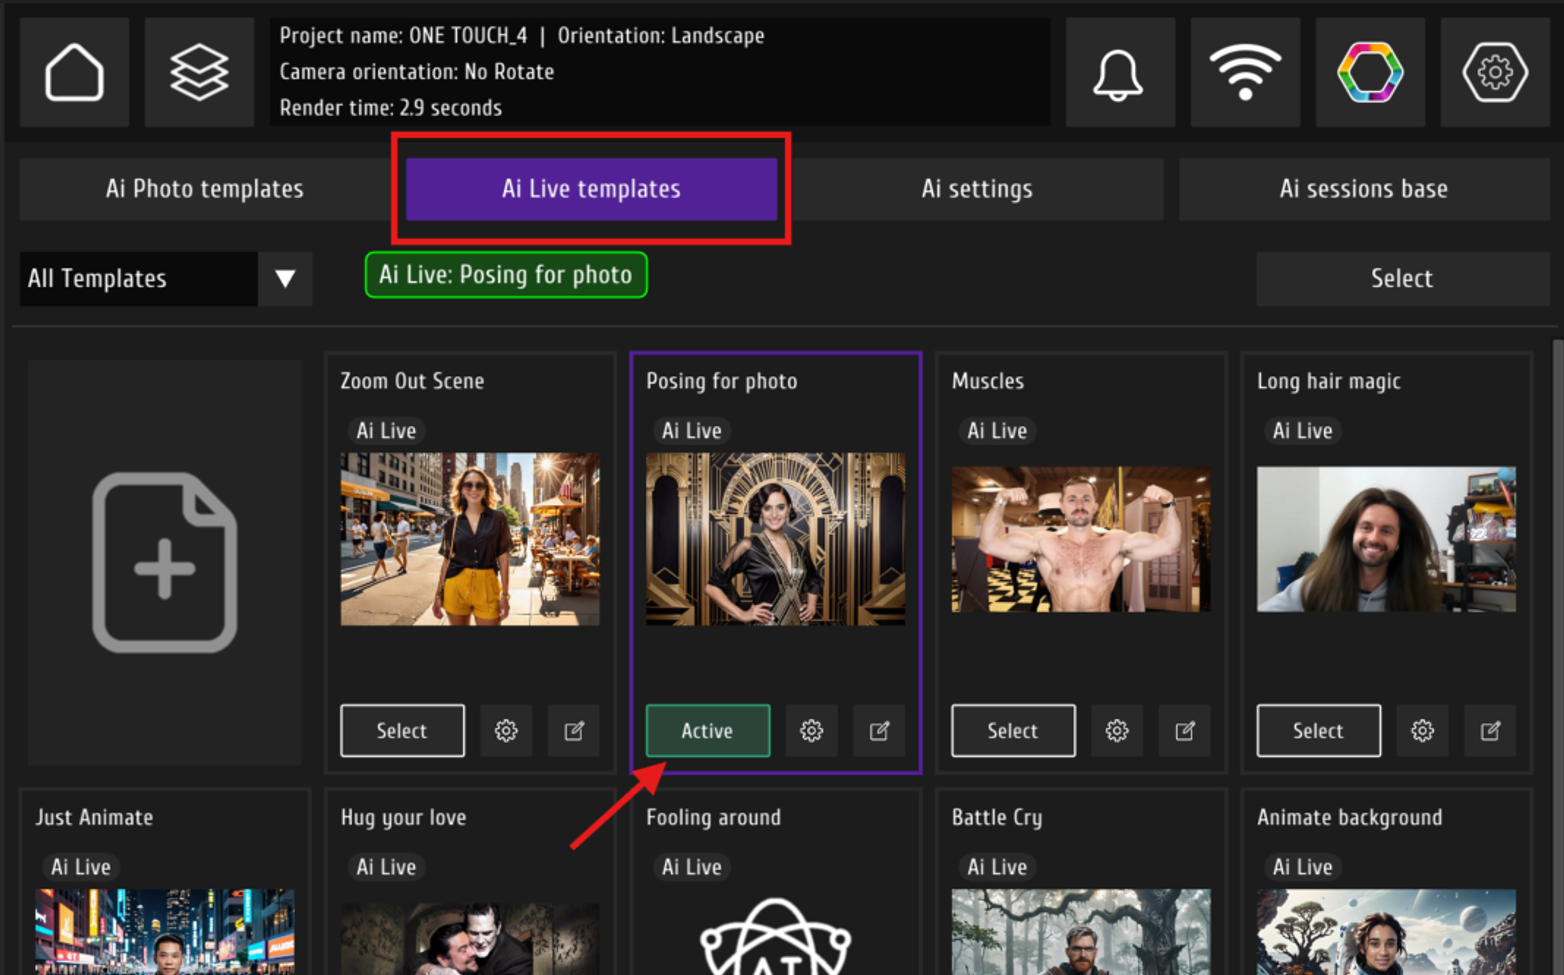
How to Activate AiLive:
- Go to the Ai Wizard menu and click on the Ai Live tab.
- Select one of the available options by clicking Activate.
- Remember to enable paid processing, as AI Video is not available in demo mode.
AI Video Template Settings:
- Ai Live Model: Selection of AI neural network model for AI video generation.
- Prompt: Enter the text that describes your video idea. We recommend keeping it simple.
- Duration: Set the length of the video that will be generated from your photos.
- Quality: Choose the video resolution. We suggest 540p or 720p as a good balance between cost, speed, and quality.
- Effect (Optional): Select one of the available video effects. When you choose an effect, the prompt will be ignored.
- Style (Optional): Pick a visual style for your video processing.
- Use Deepfake to fix faces (Optional): Additional AI post-processing to preserve faces in video.
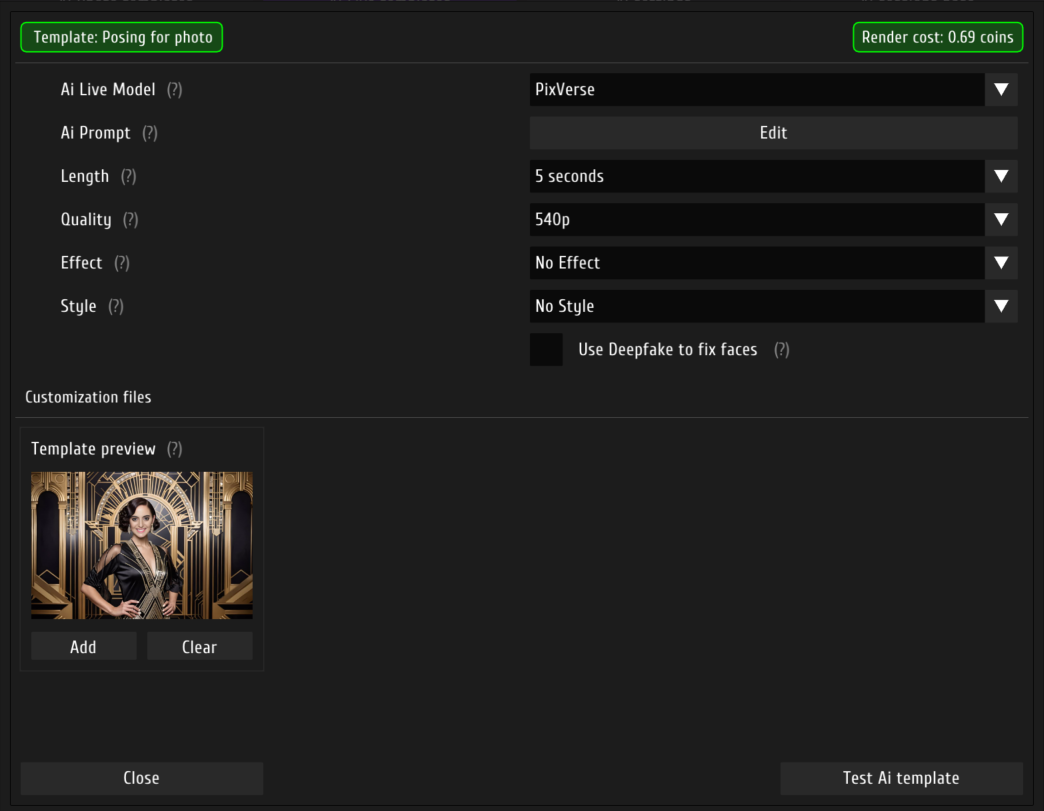
What is the difference between the PixVerse and Kling Ai models?
- PixVerse: fast, high-quality processing, with a choice of effects and styles. Processing at medium settings (540p, 5 seconds) takes about 30-40 seconds
- Kling: High quality processing, costs less than PixVerse, works better with Prompts, but processing takes longer. Up to about 2 minutes for 1 video (720p, 5 seconds).
Adding Branding (Frame, Music, etc.) to AI Videos:
Creating a Boomerang from AI Video:
- The settings for branding your video (like adding a frame or music) are the same as those for shooting regular videos.
- Use the video editor and customization menu to adjust the final look of your video.
- More details about video customization and the video editor can be found here: Video manual
Creating a Boomerang from AI Video:
- Yes, you can create a boomerang effect by repeating the original video several times and then applying a reverse effect.
- More details on video settings can be found here: Video manual
Processing Time:
Video Mode in Projects:
Orientation Settings:
Handling Multiple Photos in a Template:
Demo Mode:
- The time it takes to process an AI video depends on its duration and resolution.
- For example, a 5-second video at 540p resolution takes about 30-40 seconds to generate (PixVerse).
Video Mode in Projects:
- You do not need to enable a video mode in your project to use AiLive.
- Your video styling settings will still be applied to your AI-generated clips.
Orientation Settings:
- Make sure the orientation (portrait or landscape) of your photos and videos is the same. Otherwise, the video may be cropped.
- The video orientation is set in the project settings when you create the project (or you can change it later).
- The photo orientation is determined by the photo template you choose.
Handling Multiple Photos in a Template:
- If your template contains multiply photos, only one AI video will be generated—from the last photo in the session.
Demo Mode:
- There is no demo mode for AI Video. Video generation is available only with paid processing.